GitHub Codespaces for Machine Learning
Give potential contributors to your ML project a smooth onramp by providing a pre-configured IDE environment.
Attempting to contribute to an open-source machine learning project requires a leap-of-faith. Is there a list of dependencies? Where is the training data? Is there a pre-trained model? Should I just bail and watch Lego Masters instead? It can take hours to hotwire an ML project.
This is why I was very excited to hear about the BETA release of GitHub Codespaces at Satellite 2020. With Codespaces, contributors can spin up a ready-to-go GitHub project-specific dev environment in the cloud. In this post, I’ll show how to give potential contributors a graceful start by configuring Codespaces for an ML project.
Doesn’t Google Colab already do this?
Online notebook services like Google Colab provide a Jupyter notebook environment in the cloud. These are great for proof-of-concepts, but a notebook-only environment falls down when you move beyond exploration for several reasons:
- Sharing code across notebooks - evolved ML projects use purpose-specific notebooks that have shared components (like loading data). It’s not easy keeping your notebooks DRY in a notebook-only environment. This results in a bloated, inconsistent code base.
- Explicit vs. implied dependencies - notebook environments come pre-installed with a number of Python packages. While this is nice when proving a concept, relying on these implicit dependencies is fragile and breaks a key principle of 12 Factor apps.
- Versioning data - An ML model’s output is dependent on both code and training data. Both need to be in version control to ensure the results are reproducible. This isn’t possible with a notebook-only environment.
- Beyond the notebook - While somewhat obvious, if you want to provide other avenues to use your model (like an HTTP web service or CLI) you can’t make those available in a notebook-only environment.
With GitHub Codespaces, you have both a Jupyter notebook environment and a full IDE experience (code editor & terminal access). You don’t have to resort to ugly workarounds for the above issues.
The ML foundation - whisk
$ pip install whisk
$ whisk create demo
$ cd demo
$ source venv/bin/activate
whisk creates a data science-flavored version of a Python project structure.
It’s easy to run an ML project within Codespaces when it has a solid structure. The project structure in this tutorial was generated using whisk, an open-source ML project framework that makes collaboration, reproducibility, and deployment “just work”. I’ve been developing whisk with Adam Barnhard of Booklet.ai.
whisk generates a Pythonic project structure that makes it easy to share code across notebooks, version control data with DVC, distribute a model as a Python package, and spin up an HTTP web service for the model. whisk extends many of the ideas put forth in Cookiecutter Data Science. Because a whisk ML project behaves just like a Python project, it’s easy to spin up a Codespaces environment.
The ML project - Real or Not? NLP with Disaster Tweets
![]()
I’ll be referencing Real or Not? NLP with Disaster Tweets, an ML project that trains a Tensorflow-backed Keras model to detect if a tweet is about a legitimate disaster. Besides the raw trained model, the project contains:
- A notebook to explore the dataset
- A Flask HTTP web app to invoke the model
- A CLI command to invoke the model
- A versioned dataset and pipeline via DVC
- A CLI command to distribute the model as a Python package
Outside of the notebook, these pieces require a full development environment, not just a notebook environment.
Just add a devcontainer.json file
With Codespaces, you customize the environment with a devcontainer.json file. You can place a devcontainer.json file in the top-level of your project or inside a .devcontainer directory.
This project’s devcontainer.json file looks like this:
{
  "image": "mcr.microsoft.com/vscode/devcontainers/python:3.7",
  "extensions": ["ms-python.python"],
  "postCreateCommand": "bash .devcontainer/post_create.sh",
  "forwardPorts": [5000],
  "context": "..",
  "settings": {
    "terminal.integrated.shell.linux": "/bin/bash",
    "python.pythonPath": "./venv/bin/python"
  },
}
Here’s why these settings are used:
- image - Use the Python3.7 Docker image. The project only relies on Python being installed - all of the remaining dependencies are listed in the
requirements.txtfile inside the project. - extensions - While the ms-python.python extension includes several nice-to-haves, the primary purpose of the extension in this project is that it installs Jupyter Notebooks. When opening a
*.ipynbfile, Codespaces uses a notebook editor view letting contributors run and modify notebook cells. - postCreateCommand - After the container is created, the
post_create.shscript initializes the whisk environment and grabs data files via DVC. - forwardPorts - Forwards port 5000 (the port used by the Flask app) so the HTTP web service can be used.
- context - This is the path that the Docker build should be run from relative to the
devcontainer.jsonfile. As I’ve includeddevcontainer.jsoninside a folder, I need to access the parent directory which contains the top-level project. - settings - The key/values here are VSCode settings. These set the terminal to use bash and provide the path to the Python interpreter. These are the available Python extension settings.
View the devcontainer.json reference on the Visual Studio website for a list of all available configuration settings.
Running the project inside Codespaces
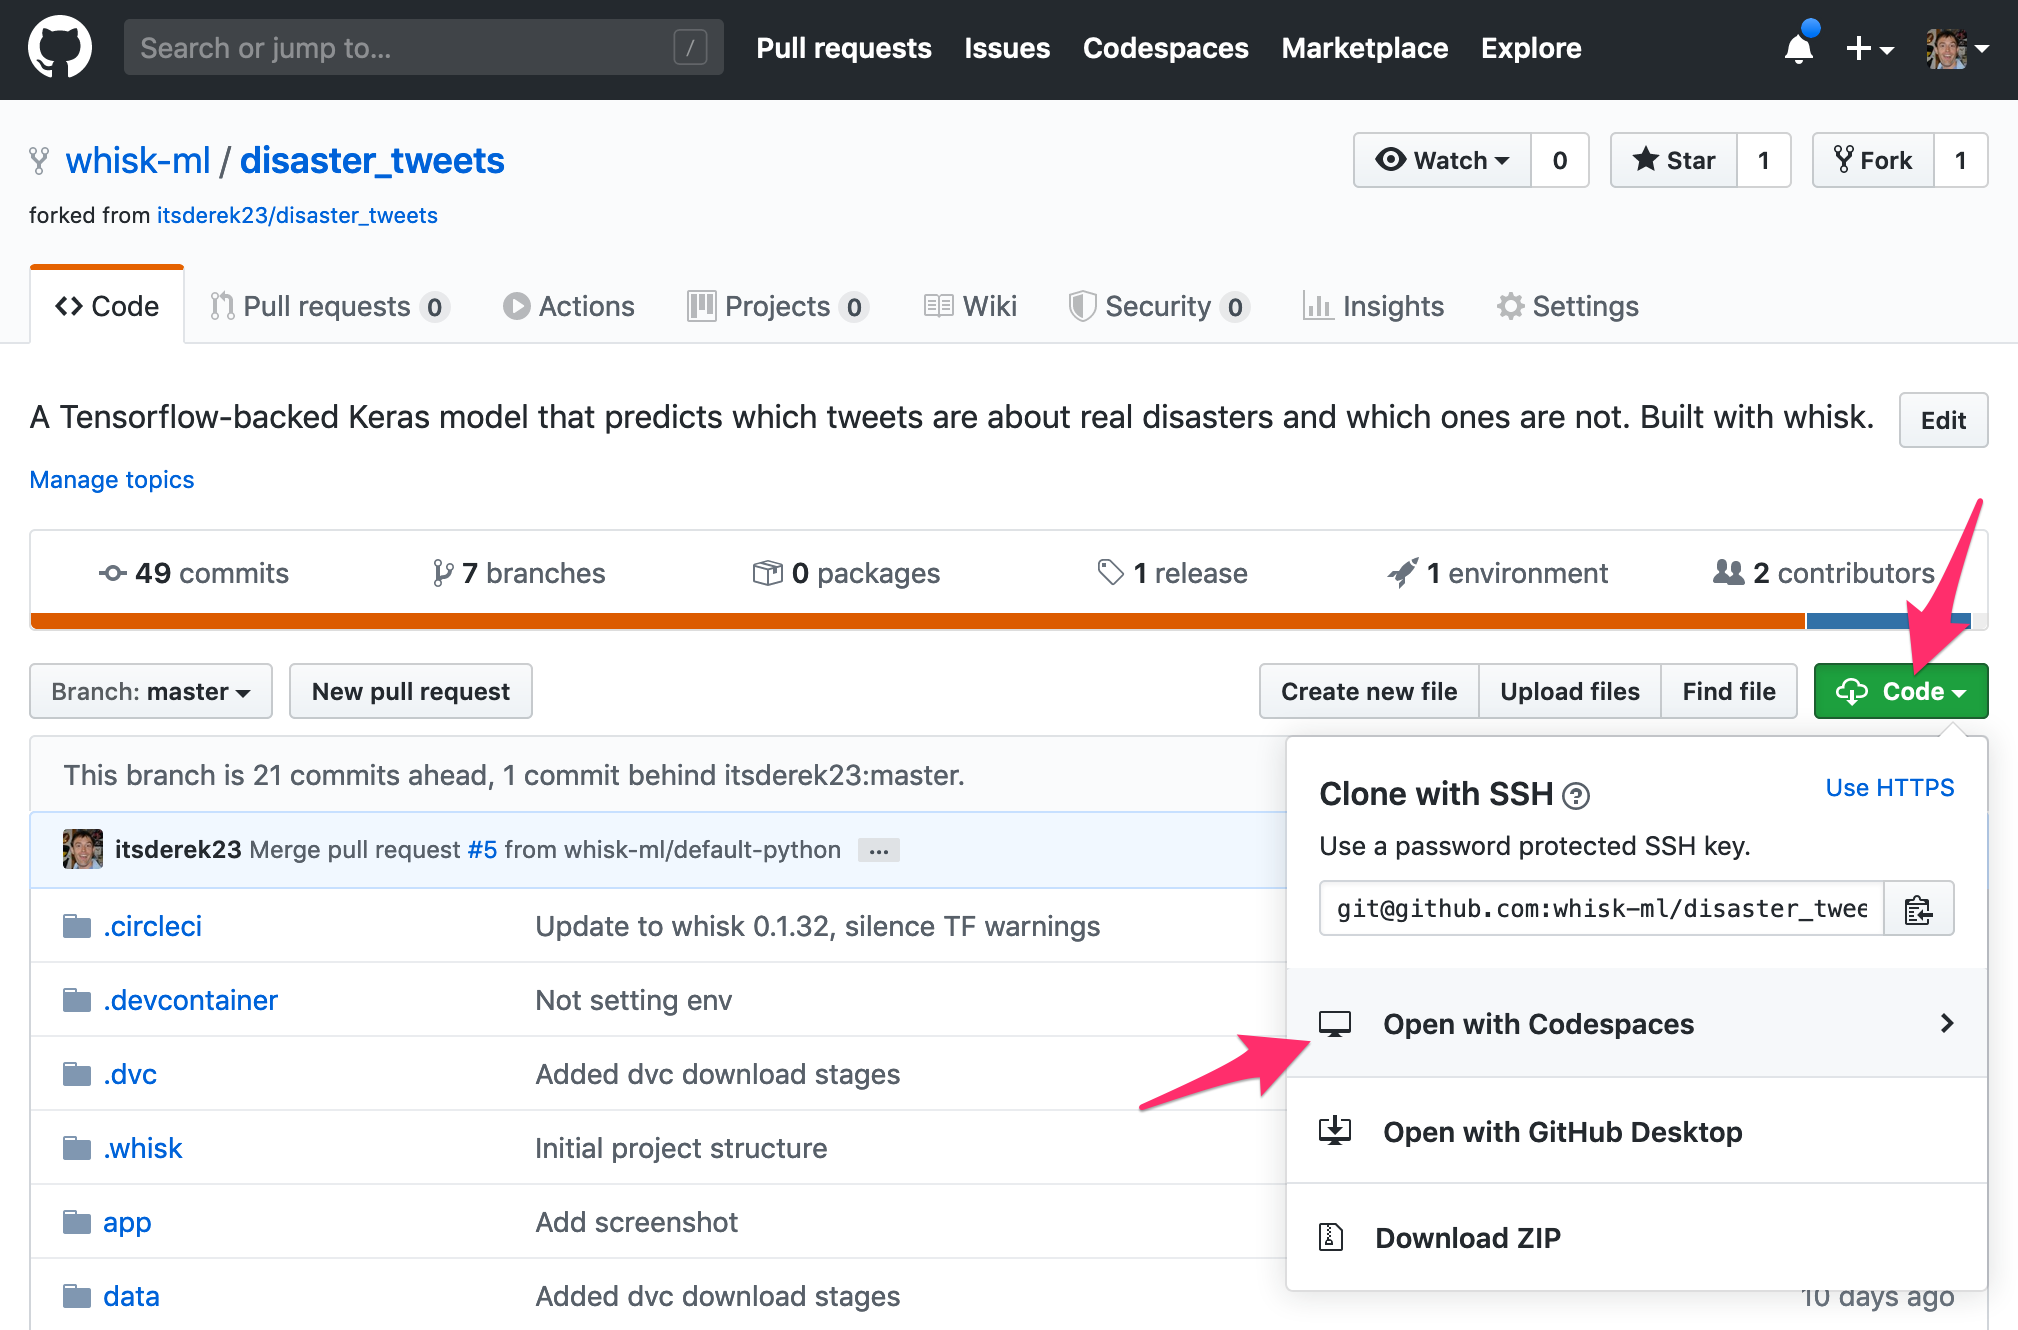
We’re ready to start. From the GitHub project, click the “Code” button and create a new codespace. After a couple of minutes the project environment will be created.
The notebook
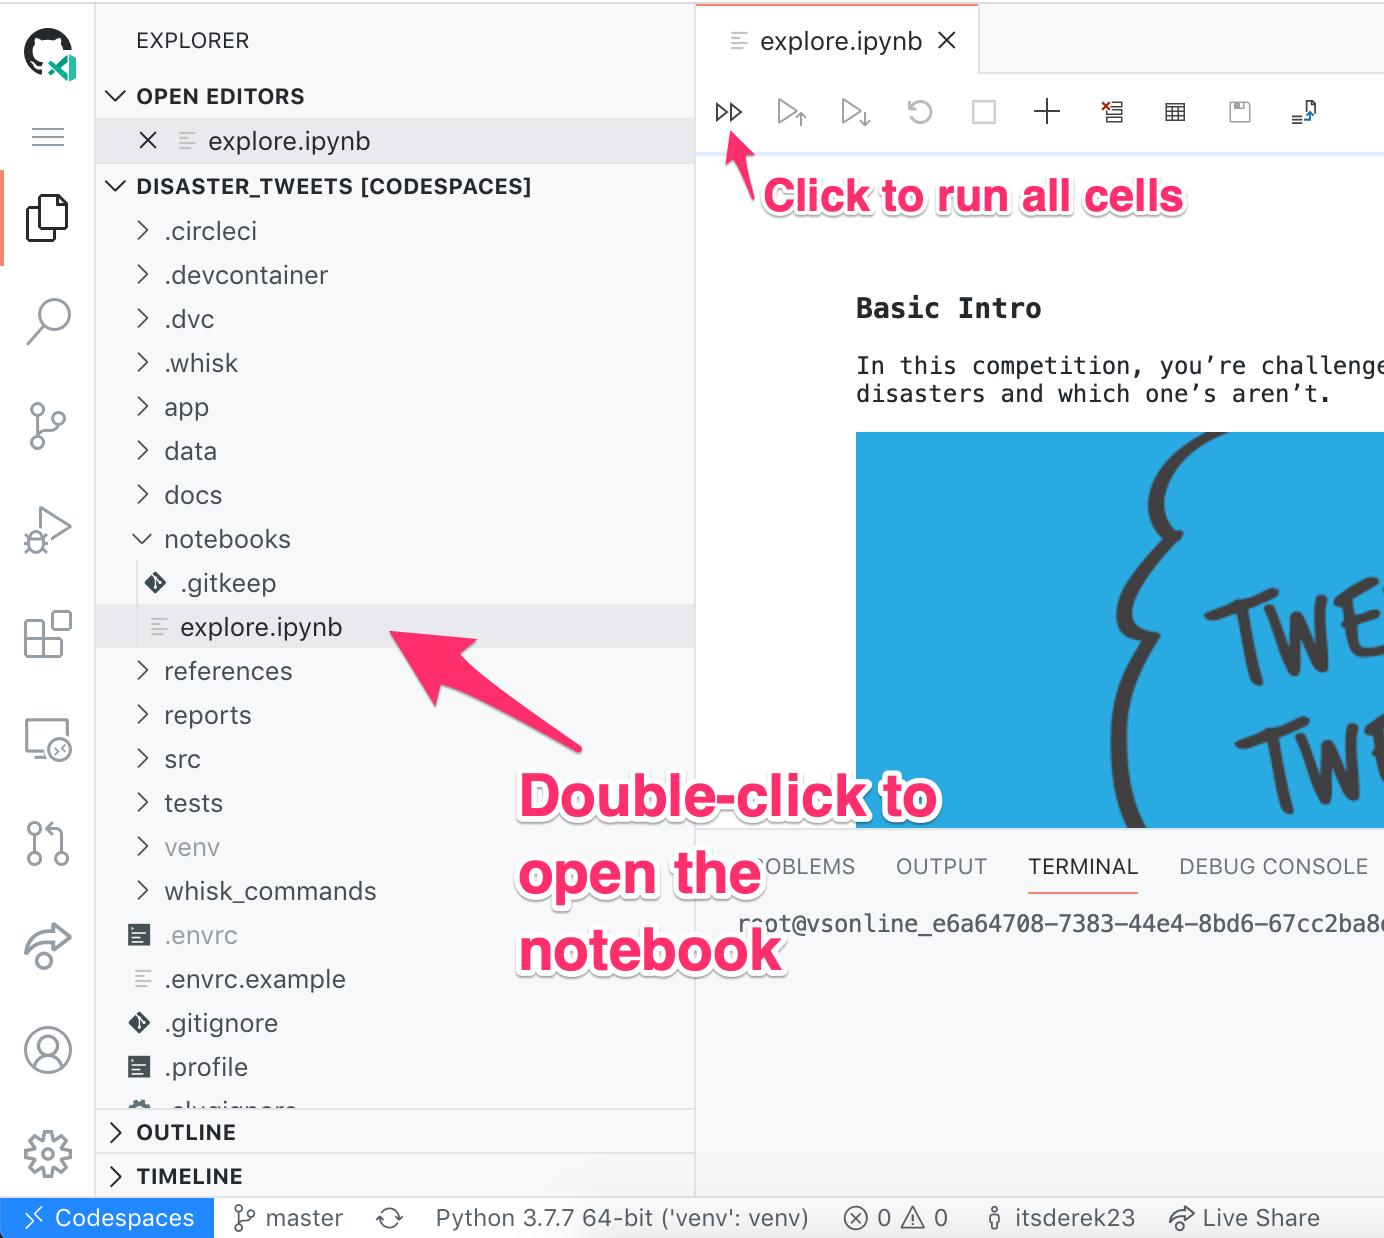
In the sidebar explorer, double-click on “notebooks > explore.ipynb”. This loads the iPython notebook and initializes the Python extension. Click the fast-forward button to execute all of the cells.
The terminal
Open a terminal session from the sidebar:
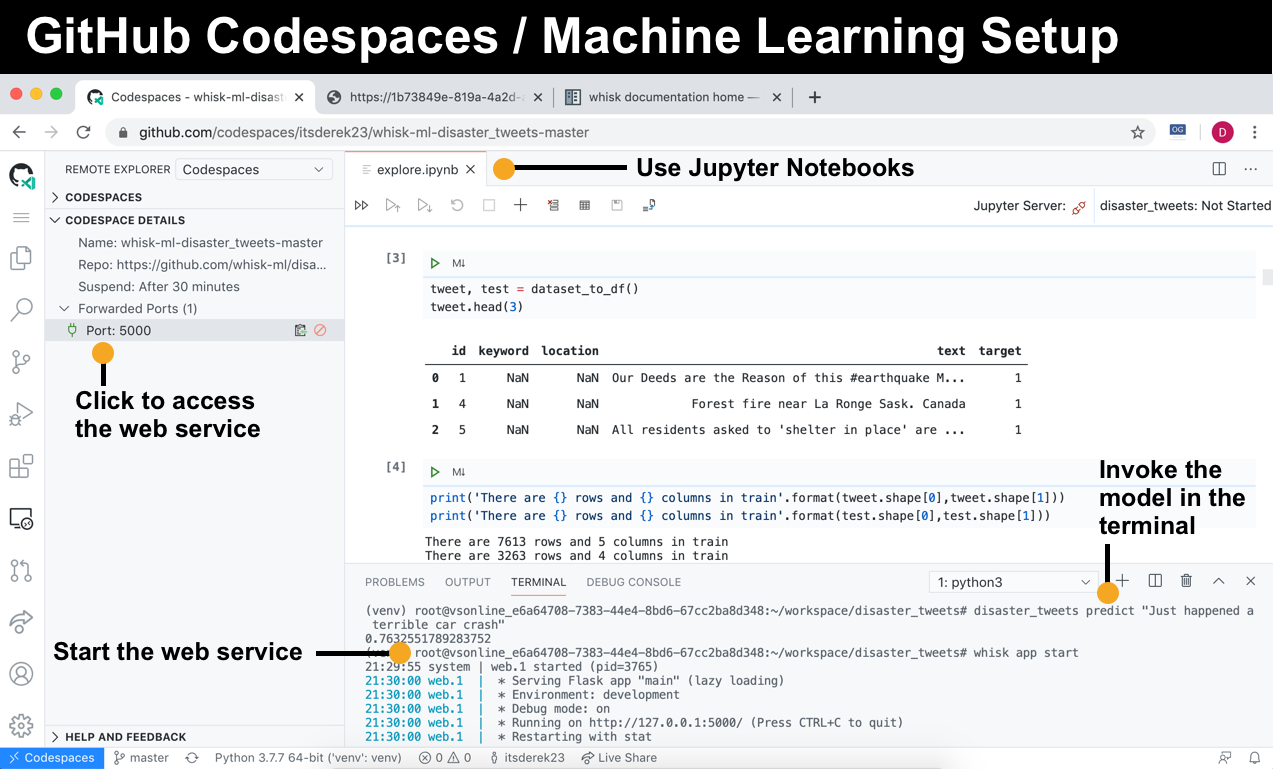
Invoke the model
whisk sets up a CLI to invoke the model. You can run this from the command line:
In the above example, the model believes that this is most likely a real disaster.
Use the web service
whisk also sets up a Flask web service to invoke the model. You can use the web service from Codespaces (mind blown). To start the web app, run whisk app start inside the terminal. To view the web app in your browser, click the remote explorer icon and “Port 5000” under forwarded ports:
You can even view web apps inside GitHub Codespaces.
See the pipeline for training the model
You might be curious: how is model is trained? What files does the training stage generate? As this project uses DVC to version control the training pipeline it’s easy to inspect the training flow from the terminal.
From the terminal you can view the stages in the pipeline with dvc pipeline show:
dvc pipeline show --ascii train.dvc

+----------------------+             +--------------------+
| download_dataset.dvc |             | download_glove.dvc |
+----------------------+             +--------------------+
                    ***               ***
                       ***         ***
                          **     **
                        +-----------+
                        | train.dvc |
                        +-----------+
DVC shows that there are three stages and that the train stage depends on two download stages.
You can view the outputs from all stages with the -o flag:
dvc pipeline show -o train.dvc
data/raw/train.csv
data/raw/test.csv
data/raw/sample_submission.csv
data/raw/glove.6B.100d.txt
src/disaster_tweets/artifacts/model.h5
src/disaster_tweets/artifacts/tokenizer.pickle
Training generates the model.h5 and tokenizer.pickle files.
No need to run training
One of the great things about using DVC to version control the training pipeline is you only need to re-run the training stage if any of the stage dependencies aren’t up-to-date (ex: you modify the training script or raw training data). Training takes about 20 minutes in this project. With the dvc repro command we know that training does not need to be re-run as nothing has changed. This delivers a much faster bootstrapping experience:
Future enhancements
There are some things I’d like to improve about this setup in the future:
- git commits fail via the UI - Currently I can’t commit from the UI as it doesn’t appear the git commands are run within the project’s venv. My commits fail as I call
dvcin a pre-commit hook and dvc is installed in the venv. This hasn’t been a blocker for me as I use the terminal anyway for git. - Clearer ready state - Codespaces appears to let you use the IDE before everything is loaded. For example, I can open a notebook prior to to the Python extension being installed. When this happens, I’ll see a bunch of scary warnings (ex: Python isn’t installed). Waiting a bit clears the warnings and then I can execute the notebook.
Summary
With a whisk-structure ML project and a devcontainer.json file, you’ve created an easy onramp for potential contributors. Codespaces is a good option when your project has evolved beyond the proof-of-concept, single notebook stage of an ML project.